How to enter the TP-Link router menu
Setting up a router from the TP-Link company
TP-Link routers are the leaders in the wireless router niche. These are reliable and high-quality devices that can work in small apartments, country houses, offices, industrial premises, cafes and stores. After you’ve purchased a router, the question is how to connect and configure it properly. You can entrust the configuration to wizard or do it yourself. Then we will consider how to configure the router from TP-Link. In addition, let’s discuss all the nuances of connecting the device and get acquainted with the characteristics of the most popular models of wireless routers.
TP-Link wireless router quick setup
If you have not previously configured Wi-Fi routers, we suggest to get acquainted with the most popular models of wireless routers, so that you know their features:
- TP-Link TL-WR840N. Probably the best model from TP-Link. Ideal for an apartment or vacation home. The device with a maximum data transfer rate of up to 300 Mbps. Low price and simple interface allows you to configure the router correctly yourself.
- TP-Link N300 V2. A multifunctional wireless device with the ability to connect a 3G or 4G modem. Users can create a guest network to hide sensitive data. It is also possible to set up a bridge for remote tunnels. The user interface is very simple, even a child can cope with the configuration.
- TP-Link TL-WR845N. This is another representative of the N300 line. Data transfer speeds of up to 300 Mbps. It is possible to play multiplayer games, watch videos in good quality. In a word. The device will fully meet your needs.
In addition, all of the above modems can work with different types of connections: twisted pair, optical network, telephone line for trimmer. Some routers can be configured via a mobile app. This applies to all N300 series models. Just install the app on your cell phone and you can manage the core settings: create guest networks, configure IPTV, proxy, etc.
Below we will consider in detail what settings of the TP-Link router should be properly configured. Also we’ll show you how to set required settings automatically. Our tutorial can be used for all N300 series devices.
How to access the router to make settings
To log in to your TP-Link router, do the following:
-
Switch it on and connect it to the PC or notebook with a network cable. This is necessary to ensure communication between devices. It is important that the cable supplying the Internet is plugged into the special socket, which is highlighted in color. The other jacks are for wired connections to other devices.
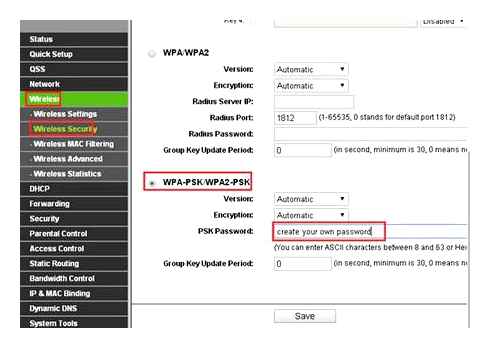
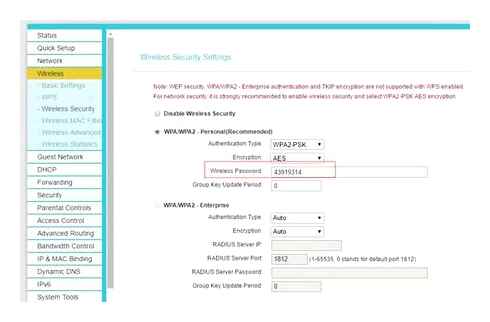
After these actions it is possible to set the required parameters, which include a new password, speed limit, limit the number of users who can simultaneously connect to Wi-Fi, etc.
TP-Link ID: remote control settings of the router
TP-Link ID is used to enter the TP-Link router menu remotely. That is, it is a system that allows the user to change the basic settings of the hardware without directly connecting to the router.
The possibility of using TP-link ID is supposed only on routers like “Archer”. Logging in to other models of devices is done via a direct connection to the router connection.
How to Setup & Configure TP Link WiFi Router Using Mobile
Before using the TP-Link ID service, the router owner is required to register:
- Connect to Wi-Fi signal.
- Go to the web interface of your device.
- Open the device value management menu.
- Open the “TP-Link Cloud” item.
- Select the “Register Now” option.
- Enter your registration information: email and password.
- Go to your email address and confirm the account registration.

After registration, the user can log in to the router settings via https://www.Tplinkcloud.Com. In this case, logging in through a direct connection to the router using the “admin-admin” data will become unavailable.
Manage your TP-Link ID through your smartphone or tablet
After registering at https://www.Tplinkcloud.Com user can install the “TP-Link Tether” app on his smartphone or tablet for remote management of the router from a portable gadget. The program includes:
- TP-Link router settings menu.
- Possibility to link a new Wi-Fi router to the account.
- List of all router models that support TP-Link ID.
The application supports both Android and iOS. In addition, the program is translated into Russian, which greatly simplifies the management of TP-Link wireless devices.
Connecting the router to your PC
After buying a TP-Link Wi-Fi router in the store, customers become owners of the kit, which includes a number of components:

- Router case.
- Network cable to connect the device to the computer.
- Instruction manual that describes how to troubleshoot any malfunctions.
- Power supply.
- Documentation with the product specifications.
- CD with materials.
To begin with, it is necessary to connect the purchased device to the computer. In frequent cases, the cable that comes with the range to the router is not long. That is why you should place the router close to the computer. Plug one side of the cable into the Internet connector, and the other to one of several LAN connectors of the router, which are usually highlighted in yellow and have a corresponding label next to them.
Connect the cable from the Ethernet provider to the WAN port marked in blue.
How to Connect a TP-Link Router
First, distribute the wires around your apartment so that you are comfortable. The wire from the ISP and from the router to the computer/laptop. Usually this is done at the stage of repair, but if your baseboards allow pulling wires into them, then do it.
Connect the wire from your ISP to the router’s WAN port, which is usually blue (see picture). And plug the devices you need into LAN sockets, unless you want to work purely with Wi-Fi. But for the initial setup I still recommend to configure everything by wire. By the way, the wires from the router to any device are called “patch cords”.
Now you are connected, let’s move on to step two. For details on how to connect the router to the computer read the following article.
Guest network
Almost all TP-Link routers support setting up a guest network. This allows you to create a separate SSID for Wi-Fi, shielding it from the home group. To do this you only need to set a few simple parameters.

After saving your settings, proceed to view available Wi-Fi networks. Now there should be a created guest network.
Wired connection
The primary method of connecting the router to a personal computer is to use a LAN wire. To perform this task, the user only needs to perform a few simple manipulations. Before we begin, let’s clarify that the first steps of this method are mandatory in any case, so we will not duplicate them when we consider the following.
-
Unpack the box with the router, find there the power cable and pay attention to the back of the equipment, where all the existing connectors are derived. Here you need to find the port marked “Power”, which corresponds to the connector of the selected cable. Connect one side to the router and plug the other side into an outlet.
Often with this type of connection there is no need to perform other actions, but there are situations when for some reason there is no internet. Then you should once again check the indicators, as well as the parameters of the operating system, about which in more detail
How to reset the TP-Link router?
It is also necessary to mention how to reset the router to factory settings. This operation may be required if the authentication data indicated on the label does not match and the user does not know the router’s new login/password.
In this case it makes sense to reset your router to factory settings and reconfigure your router. To do this, almost all types of routers have a small hole next to the power button, labeled “Reset,” inside which is a button to reset the router.
To reset just gently press this button with something thin (like a needle), hold it in this state for 5-15 seconds and wait for your router to reboot.
On different router models, the reset button should be pressed:
- – Or with the device plugged in,
- -or with the router switched off, which should be connected to power with the reset button pressed: it’s okay if you try both options.
Also, if you can access your router’s settings, you can reset your router in the web menu of that device. To do this, go to the tab “settings”, then “reset” and wait for the device to reboot.