How to connect your HP laserjet printer via Wi-Fi
Connect a Printer to Notebook via Wi-Fi
Let’s find out how to connect printer to laptop via Wi-Fi without Router. We’ve previously covered a similar topic of connecting an all-in-one printer to a laptop through a router, but now we’ll take a more local look at how to install a Wi-Fi printer to a laptop without a router. Let’s look at possible problems, why your laptop may not see your printer, when connecting via Wi-Fi and similar errors. First, let’s look at the different options for connecting a wireless printer to a laptop without using a router.
How to connect Wi-Fi Hp LaserJet MFP 120 Neverstop printer
Let’s analyze main types of connection between Wi-Fi-Printer and PC via Wi-Fi network.
Connecting a Wi-Fi printer to your computer
It is possible to establish a connection with an all-in-one printer and a PC or laptop using a wireless network. How to print via Wi-Fi printer:
- Connect via LAN. The access point must be available at all times. The all-in-one printer and PC are connected to the same network and find each other via the “Network Neighborhood”.
- Connect all-in-one printer via Wi-Fi router. To do this, connect the all-in-one printer to the router and make sure that WPS is enabled. To send the document to print, you need to search for the available networks, specify the network password and confirm access. The appropriate icon will then light up on the device. You do not need to set it up additionally, the PC itself will automatically install the driver, and the setup will be finished.
Using your local network for printing
Detailed description of how to print via Wi-Fi from a laptop over the network:
- Connect the all-in-one printer to a PC.
- Make it available to other users. To do this, find the necessary all-in-one printer in the tab “Printers and Faxes” and in the tab “Properties”. “Access” check the box “Share”, click “OK”.
- Find a multifunctional device in your PC that will print documents. Open “Printers and Faxes”. “Add a network printer” on the router, then find the desired all-in-one printer in the list and press “OK” to confirm. After that it will appear as available on the computer. To print only on this device, it is necessary to set its “Default use” in properties.
Important! You can print documents over a wireless network using a tablet or phone.
Connecting via a router
To decide how to print via Wi-Fi router, decide on the connection method. On the decision affects the availability of the chosen option and the speed of the signal. There is a possible wired and wireless method.
For devices without an integrated wi-fi connection, a wired connection is sufficient. Connect it to the router with USB. This is the best option. Reboot both devices to update their configurations. The PC and the router must be connected to an active network.
To safely print documents, it is necessary to configure the system:

- Open the setup for the router by entering the address in the browser: 192.168.0.1, it may be slightly different, but in the instructions to the router it must be prescribed.
- In the window that pops up, specify “Login” and “Password”, information about this is on the back of the router.
- In the network connections menu, the all-in-one printer must be detected.
The wireless connection for advanced models of printing devices does not cause any problems. They must have Wi-Fi built in. To configure the device, you need to press the Wi-Fi button, within a couple of minutes, the devices should find each other. It remains only to enter the “user login” and “password” for access. The setting is almost automatic.
Important! The PC to which the networked printer is connected must always be on to access printing at all times.
Printing sharing
Open access to printing allows all users on the network to use the machine. This is very convenient because you don’t need to connect every device.
Before you begin to configure the all-in-one printer, you must make sure that the network works without errors, all computers on the network are visible in the “Network Neighborhood”, the printer works properly and the correct drivers for it are installed.
How to print over Wi-Fi with open access printing:
- Select “Printers and Faxes” in the “Control Panel.
- Open “Properties” in the list that appears.
- Select “Share” under the “Access” tab.
- Under “Security” select “Print for all users.
WPS and what it provides
WPS is a standard that makes it easy to set up a Wi-Fi network.
If your router or printer supports WPS, you can connect to it.
Simply press the Wi-Fi button and hold down the WPS button on the router for 1-2 minutes. After that, the printing device will connect to the network. Then you can install the HP ePrint app on your phone via Google play or the App Store, and use it to print. On Windows Phone this program is called “HP Smart”.
And then there is Air Print, developed by Apple, Cloud Print, and others.
Please note! The phone must connect to the network, and only then you can work with the application.
Setting up and connecting the HP LaserJet P1102w Wi-Fi printer to your router network
In this material we will consider how to connect and set up HP LaserJet P1102w printer to home or office router Wi-Fi network by means of WPS button and through installation of software from HP official site. With this article, you can set up most HP printers with a Wi-Fi module that don’t have an information screen on the panel
Welcome to our website: osmasters.Pro
The “w” in HP printer names denotes the presence of a Wi-Fi module. Consider this when purchasing your printer
Unpack the printer and connect it to a 220-volt power supply. You will connect the interface cable to your computer in the middle of the setup process, but you do not need to do this yet
If you have already tried to set up the router or if it is connected to another network, first of all, reset the printer to factory settings: turn off the printer, then press the two buttons on the top panel (the antenna and cross buttons) simultaneously, then turn on the device. Requires you to hold down the keys for 20 seconds after powering on until the orange and green LEDs start blinking simultaneously and rhythmically
Connecting the printer to a wireless network using the WPS button on the router
Press the antenna button on the printer (top button in the picture above). Press the WPS button on the Wi-Fi router (in some models, it is necessary to hold the button for a few seconds)
In one to two minutes, the printer is connected to the wireless network
Details on how to use and configure the WPS button (it can be disabled by default in some models) are described in our router configuration materials:
To print from a smartphone or tablet, use the HP ePrint application (for Windows Phone. HP Smart). Install it through the app store (Play Market, App Store). To print on the printer, your smartphone (tablet) must be connected to the Wi-Fi network
After starting the application you need to select a photo or a document to print, then the application will find the printer in the local network by itself, and you will only have to press the “Print” button
Connecting your HP LaserJet P1102w printer to your wireless network and installing the driver from the official HP website on your Windows computer or laptop

To set up the printer, use a computer or laptop connected to a wireless network
After resetting you need to install the software. You can use the diskette included in the package, but it is better to download the latest version from the manufacturer’s web-site
Go to the manufacturer’s website by following the link, enter the model name in the search line and click “Search”
The operating system version is automatically detected. In our case we need the software for 32-bit Windows 7
Choose the required software set below. In the section “Driver-Device Software Set” click the “Download” button against the line “Full featured software and driver for HP LaserJet Pro P1100, P1560, P1600 series”

Once the download is complete run the installer file
Wait for the software to unpack the package and extract the files
In the selection window of the device in use, find the desired printer series (in our case, the P1100) and click on “Wireless Installation”
In the next window, click the “Install Printer Software” link at the top, not the “Start Installation” option (although the latter is larger and more eye-catching)
Select the “Extended installation” radio-button in the “Installation type” window and press the “Next” button
Be sure to agree to the terms of the license agreement (check the box and click “Next”)
In the “Privacy Policy” window, click “Next”
In the next window, uncheck “Install HP Customer” to not take part in the surveys, and click “Next”
In the next window, choose the printer model, in our case it is the P1100w Series, and click Next
In the “Printer connection method” window, choose the “Wireless printing setup” item
Wait for the software components to update to reflect the settings you selected
After updating you will see the window “Setting up to print over a wireless network”. Just now it is necessary to connect the printer to a computer or laptop intersees USB cable
Once you connect the printer, the “Setup to print” window will disappear and the software installation will automatically continue. You don’t have to click anything
Connecting via Wi-Fi
Many modern printers can connect to your router via Wi-Fi without any extra wires. As a rule they use WPS, the same button that allows to connect to the router without entering a password. Examples on the models below.
Canon
- Pressing the WPS button on the printer should cause the LED on the printer to flash.
- Press WPS on the router.
- Printer and router should connect. LED should stop flashing.
Some models with LEDs may prompt for the correct network and password. But to me, that sounds like a lot of fuss for the printer. So it’s easier to use WPS. The brightest representative of the genre in this category is MG3540.
Hewlett’s never left either. To connect, there is usually a whole menu of wireless networks. But it is easier to use the same WPS button. HP Auto Wireless Connect” technology is used to connect.
Epson
It’s the same. There is a separate menu “Wireless LAN Setup” and then there is the standard WPS button. Connect and start setting up.
Method one. Connecting via WPS
This method will only work for you if your printer and router support WPS (Wi-Fi Protected Setup). If so, follow these steps:
- Use the navigation keys in the printer menu to enter the wireless connections section;
- Select WPS as the connection method;
- Press and hold down the WPS button on the router until the LED flashes;
- Press and hold the “OK” key on the printing device until it informs you that the connection was successful.
HP Software Installation
Insert the installation disk into the optical drive of your computer. If you don’t have a driver CD or can’t run it, download the correct software from the HP website, under “Support”. To do this, enter the printer model in the search box on the left side of the screen. Click the “Find my product” button and select your operating system on the next page. After downloading the file, run it as an administrator.
Click the “Install” button on the utility’s start screen. In the next step, select the program mode:
- Simple installation. Conditions of use are accepted automatically, files are copied with default settings.
- Advanced Installation. Allows you to read the license agreement and change default settings.
How to Connect Printer Wirelessly to Computer | Printer ko wireless kaise banaye | Humsafar Tech
Choose the model of the printer you are using from the list in the next window. To connect the HP P1102w click on the first line. “P1100w Series”, then click on “Next”. Specify the connection type from the offered options:
Use the first option if you have not configured your HP LaserJet P1102w before. The application will copy the drivers required for the connection to your computer. Next, plug the printer into an outlet and press the power button on the left side of the front of the device. Connect the USB cable from the printer to your computer and wait for the P1102w to be found.
Important! If the connection error occurs, please restart the printer and plug the cable into another USB port. Search again with the HP Installer.
Printing setup
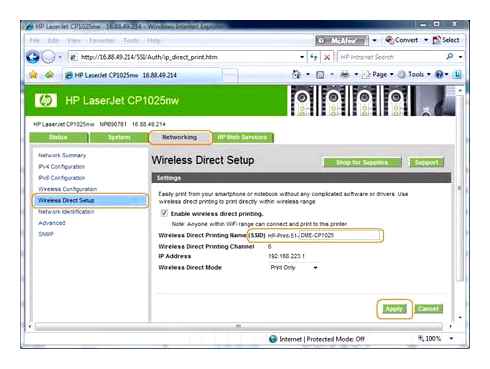
To be able to print over Wi-Fi, run the Wireless Setup Wizard (As we did before).
Start. HP. HP Laser Jet. Wireless Setup.
Next, wait for the necessary checks to pass, and then select in the window that opens:
After installing the USB drivers, the USB all-in-one printer is installed.
After that we have established Wi-Fi connections, and the operating system should have two printers installed, check:
For our printer to see the other PC, you have to run the same setup utility on it, only on the installation selection tab you have to select “Advanced” and in a couple of seconds your other PC will find the connected all-in-one printer and you can print over the network.
If you need to print from smartphone or tablet you can do it with special HP ePrint application which you can download via google play. Then you can easily print any documents and photos from your smartphone or tablet via Wi-Fi.
There is also a service center HP ePrint, with which you can send documents to print, from anywhere in the world, having only access to the Internet.