Transfer outlook to another computer
Migration of “big” Outlook accounts
The operating system crashed. We reinstalled the system, but we have a task: to transfer accounts and emails from one system to another. The fact that in order to move the “Personal folders” it is enough to find and copy the Outlook file.pst instead of a newly created one (or connect it as a second one), many people know. In Seven, it’s located here, by the way: C:\Users\%USERNAME%\AppData\Local\Microsoft\Outlook\Outlook.pst, where %USERNAME% is user name (or more precisely the name of folder where the user profile is located). The disk, by the way, may not be C:\ either, if the crashed operating system was on a different disk. And here’s how to migrate the “accounts” settings? It’s good if there were a couple or three of them. it’s easy to re-create them. And if there were at least ten of them?! It turns out that to do this, you need to pull the following branches from the registry of the user profile of the crashed system and import them into the current profile: HKEY_CURRENT_USER\Software\Microsoft\Office\Outlook\OMI Account Manager HKEY_CURRENT_USER\Software\Microsoft\Windows NT\CurrentVersion\Windows Messaging Subsystem\Profiles\Outlook HKEY_CURRENT_USER\Software\Microsoft\Office% office version%\Outlook\Options where % office version% is 11.0, 12.0, 14.0 and so on, depending on what version you are using.
Open Regedt32 and through menu “File”. “Load Hive. “Connect NTUSER.DAT from the profile of the crashed system. Go to “HKEY_USERS” and select “File. “Load Hive. ” and point the program to the NTUSER file.DAT from the old profile (find it in a user folder inside the Users or Documents and Settings folder from the crashed system). Regedt32 will ask how to name the branch to be included. let’s call it, for example, “1234”.
In the branch “1234”, which is just connected, we are looking for and exporting to reg files the three branches mentioned above. Only here, they will obviously not start with “HKEY_CURRENT_USER\”, but with “HKEY_USERS\1234\”. To export a branch to reg file: go to the branch you want and use menu “File”. “Export” perform the export (you will be asked to specify the name and location of the file you want to export to). Do the same with all three paths in the registry and we will get three reg files.
Open one by one all three reg-files in Notepad (for example right-click on them in Explorer and select “Edit” in the popup menu) and replace “HKEY_USERS\1234” with “HKEY_CURRENT_USER”. This is so that the information in the import will get into the current profile and overwrite the current information.
I highly recommend that you export the current settings too, so that you can restore everything as it was if something goes wrong. To do that, don’t be lazy and do all steps of step 2 for the current path only (you have to work with “HKEY_CURRENT_USER”). Now, in case of any problems, you can import the files from this step and restore the current state of the settings.
Now close Outlook (if it was open) and import the files from step 3. Just open them in explorer and answer the warning in the affirmative.

Everything ! After opening Outlook, you will get a complete list of ready “accounts”. Except that the passwords to the mailboxes of these records are not transferred in this way (but they seem not to be transferred from the old profiles in any way whatsoever)!), so be prepared to remember them (or change them via “I forgot the password” 🙂 ).
How to transfer Outlook archived files
The process of transferring Outlook, the file archive to the new computer is complex and consists of several steps. The first one will export the files from Microsoft Outlook in the new format. Sometimes, the data is converted into a PST file that can be opened on the new computer and even on a different version of Outlook.
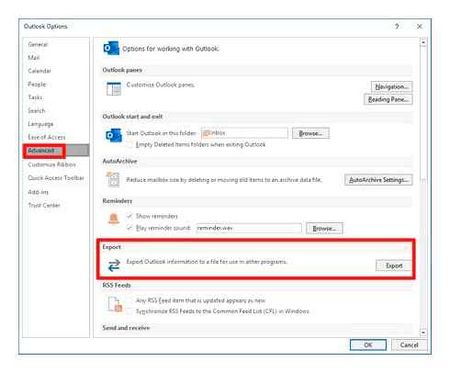
First of all, the user should open the program on the old PC. In the upper right corner, you should click on the File tab. After that, user should select Information button and then press Options. A list of actions will appear in a new window. The user must press Advanced. After doing this, you need to select the Export option.
After that, click Export to File, and then click Next. Then, should click Outlook Data File (.Pacific Standard Time) and Next. After that, user should choose the folder to export. Only one can be processed at a time. After entering the file name and selecting the storage location, the exporting part is finished.
How to transfer an Outlook 2007 account to another computer?
Outlook 2007: export Outlook items to a PST file
- In Outlook 2007, at the top of the ribbon, select File
- Select Import and Export.
- Select Export to File, and then click Next.
- Select Personal Folder File (
- Select the name of the email account from which you want to export items (see.
How to transfer outlook 2016 autocomplete list
Good day dear readers, probably many of you at work use a program to handle and receive mail such as outlook, at least most of my employees use it in the version 2013 sp1. Imagine you have a new computer for your employee and you need to move his mail to it, it does not matter if you have pop3 or IMAP, you can move the mail quickly and without problems, the most common things to forget about it are rules and outlook autocompletion list. Today we’re going to talk about the second one. And we’ll look at how to transfer the outlook autocomplete list to another computer.
What is outlook cache
Let’s begin by explaining the concept of the outlook cache. I will not go too far into the thick of history, I will only say that since MS Outlook 2003, there is a very useful feature of autofill e-mail address when typing a new letter in the field to whom, from previously sent mail addresses. In the English versions this feature is called Auto-Complet, but in our localized version the autocompletion list.
If you have MS Exchenge mail server at work, you’re in luck, because the autofill list is on it, and it doesn’t matter what computer you work on, you will see everything, the server has a Suggested contacts folder for this. But if you don’t have MS Exchenge server like I do, you will have to make up your mind when you move this outlook cache to another computer.
In older versions of outlook, before 2007, this local cache was stored in the Outlook.NK2. This file was located under this path:
C:\Documents and Settings\%username%\Application Data\Microsoft\Outlook\
From Outlook 2010 to 2016, the outlook address cache no longer resides in the Outlook file.NK2, it just doesn’t exist, now everything is in Stream_Autocomplete_0 file.dat file, which we will talk about below. I forgot to mention that I previously introduced you to this technology and told you how you clear the outlook 2013 cache and up.
Where the outlook autocomplete list lies
Let me now tell you where this outlook cache lies and what needs to be transferred to another computer. First I have my mail set up on my new computer and it works on IMAP. I’m creating a new e-mail to my [email protected] for example, as you can see if I half-fill the address, it won’t pop up from the autocomplete list, because it’s just not there.
Let’s start migration, enable displaying of hidden files and folders on the old computer, if you don’t know how to do it, read about it in the article. Then, we go this way:
Or you can also get here from the account settings by clicking on the open data file location button.
What interesting files you can find here:
- Stream_Autocomplete_0_.dat is the file with the outlook 2010-2016 autocomplete list
- Stream_Calendar_2_.dat calendar
- Stream_RssRule_2_.Dat Rules RSS
Now that you understand where the outlook 2007 cache and outlook 2013 cache are, you can safely migrate them. To complete the picture and the article, I will show how to do it for the old versions, where the Outlook file was used.NK2, but to be honest, for me these products are outdated.
Transferring the autocomplete list from outlook 2007 to 2013
For Outlook 2016, it’s the same. Copy the Outlook file to the new system.NK2, you can before applying it, run a free utility called NK2View, it allows you to view both the current cache and the NK2 files. Download NK2View here. As you can see, before moving the autocomplete list between users, I have only one address in my outlook cache, just to give you an idea of what is there now.
- for Windows 7. C:\Users\%username%\AppData\Roaming\Microsoft\Outlook,
- for Windows XP. C:\Documents and Settings\%username%\Application Settings\Microsoft\Outlook
and execute the command, you can do it right at startup:
Transfer autocomplete list from outlook 2013 to 2013
Now, what you do, on the new computer, copy the full file name Stream_Autocomplete_0_unique identifier.dat, it has a very important field, it is a set of characters (long sequence, you can compare it to SID), it is generated for all users different. So, if you just copy the old file, it will not start because you will have the wrong. Logically, you should take the old file, copy it to the new PC in the RoamCache folder, and rename it to the new name with the right ID.
As you see I have two files with cache, the old file weighs 204 Kb. Delete the new file, but do not forget to copy its name completely.
Next, you change the name of the old file with the name you copied from it and you get the autocomplete list in the e-mail.
Now you have much more contacts in a new mail, as you see, everything is very easy to solve, just in a couple of minutes.
Anykey blog Evgesha.net
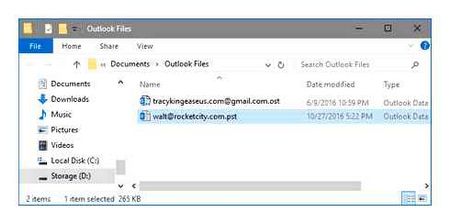
Today I will consider a very simple way to transfer data from one computer to another for Outlook 2010. For other versions I think it will be about the same. The bottom line here is. The 2010 version of the mail client has a database file with pst permission. This file is located, again in 2010 version, in My DocumentsFiles folder in Outlook. Join our group in VK! At! Smart Workshop!
All actions can be divided into 2 parts.

Moving outlook to another computer
If you just installed outlook and have not tried to open and configure it, it is very simple. First of all we have to prepare our database file with pst resolution. It’s in My Documents, Outlook Files. Copy it to a new computer and open Outlook. Then following the instructions of the wizard select the Configure server settings manually or additional types of servers.
Next, select the service by checking the Internet E-mail box.
After clicking Next you will go to the configuration of e-mail parameters. We will stop there for a moment. Fill in the required fields User Information, Server Information. In the Login to the system, in the User field, enter your login in the form of the whole e-mail address, for example admin@evgesha.net. I also advise you to immediately configure the outgoing mail server. To do it click the settings button go to the Outgoing mail server tab and put a tick in the SMTP-server requires authentication by selecting the necessary checkbox below. In our case it is the same as the incoming mail server. Then we will return to the configuration of e-mail parameters. After filling in all the required fields, pay attention to the Deliver new messages box.
By default, it says To new Outlook file. But it is possible to choose the one you need, copied from an old computer in advance. Which we do by pointing directly to it in Overview. You may be surprised, but this is it. Then go to Outlook, and enjoy the new emails, settings, rules, contacts, and everything else that’s going on.
But if you have already created a user in Outlook and you are just wondering how to migrate the settings? This is where part two begins.
TRANSFERRING OUTLOOK TO ANOTHER COMPUTER
Go to Start. Control Panel, choose View in the right corner of the window Small icons. And you are looking for the Mail (32 bit) label.
We find ourselves in Outlook mail settings. Choose a configuration section and click on Show.
Then click on Add and go through the whole process, as described in the first part. After that, choose the newly created default outlook profile, or leave it alone and remove the old one.
That’s all I think, as you see there are no problems with it. But how much easier life Join our group in VK! Repair! Smart Workshop!
Move the Outlook data file (PST files) or emails to the new computer
Follow these steps to move the Outlook data files or PST files to your new computer.
Open Microsoft Outlook on your old computer, then right-click the e-mail account whose Outlook data file you are moving, and then select Open File Folder from the context menu.
Now opens the folder containing the Outlook data file for the selected e-mail account.

Close Microsoft Outlook on your old computer.
Navigate to the folder that opens, right-click the Outlook data file, and select Copy from the context menu.
Paste the Outlook data file to the new computer.
Open Microsoft Outlook on a new computer and click File Open and Export (or Open) Open Outlook data file.
In the Open Outlook data file dialog box that pops up, open the destination folder in which you just inserted the Outlook data file, click to select the Outlook data file, and click the OK button icon.
And now the Outlook data file has been moved to your new computer and opened in Microsoft Outlook.
Note: This method simply moves the Outlook data file (including emails, calendars, contacts, tasks, etc. Д.) To Outlook on your new computer. However, to continually receive emails through a specified email account in the future, you will need to add that email account to Outlook on your new computer.
Export or back up your emails, contacts and calendar to a PST file
Suppose you want to move emails from one account to another, or you have changed computers and now want to transfer emails from one computer to another. There is nothing easier. Even if the new computer has a higher version of Outlook than the old one. Exporting e-mail data from Outlook on one computer and importing it into Outlook on another. Let’s take a closer look at Microsoft Outlook 2016, and this article will also work with Outlook 2013.
In Outlook 2016, at the top of the window, click the File tab
Click Open and export and then Import and export
In the window that will open, select Export to file and click Next
In the next window, select Outlook Data File (.pst) and click Next
In the next window, we can choose whether to export a single folder or all the mailbox items of this account. You are only allowed to export one account at a time. We will export the entire email box. To do this, select the account name and check the Enable subfolders checkbox. Click Next.
Next, click Browse and name the new Outlook data file you want to create (.pst) and specify where it will be saved. Click Finish.
Before you begin exporting, Outlook will prompt you to protect the Outlook Data File you are creating (.(pst) password. Specify a password or leave the fields blank and click OK.
Wait until export is complete. You can then use the network or USB key to transfer the file to another computer and import it into another account, or you can attach it to Outlook as an archive.
Move other Outlook files
Depending on how you are using Outlook, you may need to transfer additional files. These files are listed below.
- Autocomplete list Autocomplete is a feature in Outlook 2010 and Outlook 2007 that offers options for email names and addresses when they are entered in the To,Copy, and Cc fields. Suggested options are retrieved from the list of names and email addresses from previously sent emails. For information about moving this list, see. In the Importing an autocompletion list from another computer article.
NOTE. In Outlook 2010, the autocompletion list is no longer stored in a file with an NK2 extension. Auto-completion list items are now stored in a Microsoft Exchange Server mailbox or Outlook data file (PST file) for the account. However, if you want to copy the autocompletion list (NK2 file) from another computer on which you used POP3 accounts, you have to import the file on the new computer. For more information, see. See the article Importing autocompletion lists from another computer or the video Importing autocompletion list items.
- Signatures You can add personal signatures to messages you send. You can move these signatures to another computer. For information about moving signatures, see. For information on moving signatures, see Copying Email Signatures to Another Computer.
- Forms For information about moving forms from the old computer to the new computer, see. in an articleCopying forms to another computer.
- The items in the Safe Senders, Safe Recipients, and Blocked Senders lists can be exported from the old computer and imported into the new one. For more information, see. in the articleExporting addresses from junk mail filter lists.
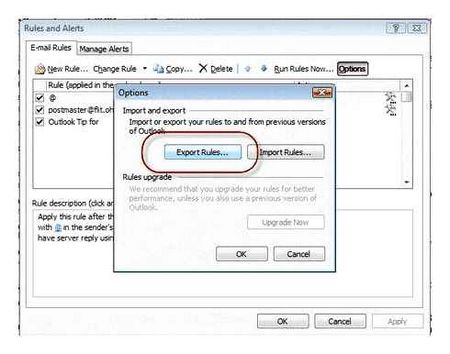
- Rules are stored in a mailbox for an Exchange Server account or a PST file for other accounts, so they do not need to be manually moved from one computer to another. In case of a problem, rules can be exported and imported manually. For more information, see. For more information, see Importing and exporting a rule set.
almixLoco developer, author of articles on web development with Yii, CodeIgniter, MODx and other tools. Team Sense creator.