How to transfer photos via computer to iPhone
Different ways to transfer photos to your iPhone from a Windows PC or Mac easily
“How to transfer photos from computer to iPhone 6?” There are a lot of people asking questions like this on the Internet. And you might have the same problem and try to find an easy way to import photos to your iPhone X / 8 // 7/6/5 or iPad from Windows10 / 8/7 or Mac OS X. Here you can find many ways to copy your photos from computer to iOS devices, just check now!
Click here for more information about Transferring photos from iPhone to iPhone.
Option for iTunes version 11.0 and above
It is worth noting right away that if you need to transfer video files to iPhone model 4 or 5, this method will also work. So first we will need to prepare all the necessary files and transfer them to a folder on your desktop. Give the folder a meaningful name, under which it will be displayed on the phone in the “Photos” section in the future. Then we take the USB cord and connect our iPhone to the computer, and then iTunes will open.
Then perform a few simple steps:
- Select our iPhone in the top iTunes menu
- The overview window of your phone will open, where you will need to select the “Photos” section
- In the opened tab activate point “Synchronize photos” (if you still need to download and video, it will be necessary to add a tick “Include in synchronization of video”)
- Now you will need to find and select the most cherished folder on the computer, which we prepared originally (iTunes will show the number of files to be added for additional verification)
- Press “Apply”, after that the synchronization (download) process will start. Wait until it is finished and rejoice. All images and videos have been recorded on your iPhone 4/5.
Using cloud storage to upload photos to your Apple device
You can move photos to your iPhone/iPad/iPod touch using a variety of cloud storage services, such as Cloud, Google Drive, Yandex.Disk, iCloud, and more. Each service has its own applications for the operating system iOS, which are aimed at facilitating work with photos and videos, which are in the cloud storage.
Downloading photos with iCloud
In order to use iCloud, you need to install an application for your computer, which can be downloaded from the official Apple resource. The next step is to follow the instructions:
- Launch the app. Sign in with your Apple account.
- Go to “Photos” and check the photos or videos you want. After that the data will be automatically moved to the cloud storage.
- To access images from your mobile device, open the Photos app.
Marked photos will automatically become available on your mobile device
In the settings of the cloud storage, the service of auto-synchronization of photos from iCloud must be enabled.
This method is more practical than using iTunes, because you do not need to use cords, and you can access pictures from any device, anywhere.
Moving photos using Yandex.Drive.”
To work with this cloud storage you need:
- Create an account on the official Yandex website.
- Open in the Internet browser “Yandex.Disk” or download to your PC or laptop special program.
- Copy or move all the necessary images to the cloud.

To transfer files in cloud storage “Yandex” it is necessary to press the button “Download files
To get a photo on your Apple device, download the Yandex mobile app.Drive” and sign in to the app under your account.
Open a folder with stored photos in the cloud.
Photos in cloud storage can be accessed from any device, including iPhone/iPad/iPod touch
After opening the necessary photo, tap the arrow icon. In the list that opens, check “Save to Gallery.”. After that, the image can be viewed at any time using the “Photos” application.
To save the opened photo on your mobile device, press the arrow icon
The advantage of this method is that you can view your photos even without access to the internet. Besides, you can download them both ways. Both to the mobile gadget and from it to a notebook or PC.
Importing photos to your Apple device using Dropbox
To use this method, synchronize necessary files on your computer with the help of a special program, and install the Dropbox mobile app on your iOS device.
Before you start, it is necessary to synchronize your device with Dropbox
After the steps described above, you can start viewing photos from your device by selecting the folder you need in the application.
Once synced, you can view photos from your Dropbox app
This method requires an Internet connection, but does not use the internal memory of the device. You can also save folders of photos or individual images to your device for later viewing without an Internet connection.
How to transfer books from your computer to iPhone or iPad using iTunes
With books the situation is a little different. We have described in detail three different applications for reading books on the iPhone and iPad: iBooks, Bookmate, and Aibitalka. Follow the appropriate links for more information about this process.
Download and install the latest version of iFunBox.
Open the program and connect your iPhone or iPad to your computer. In order for the iFunBox to see your device on your computer you must have iTunes installed.
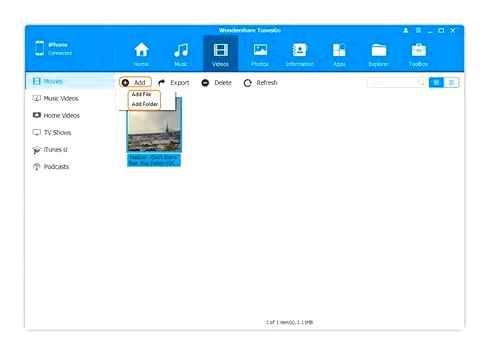
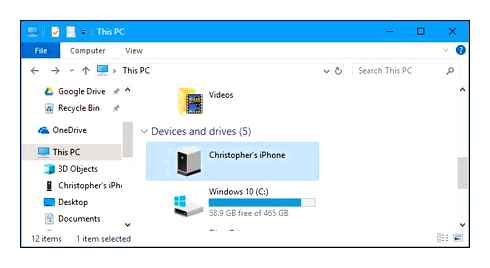
The device will be detected in the program and you can copy absolutely any files to it, using your iPhone or iPad as a flash drive.
Drop the files that need to be “moved” into the “Shared Storage” folder.
Very convenient solution that can help at the most crucial moment. For example, you do not have a flash drive at hand, but an important file “weighing” several gigabytes needs to be downloaded. Don’t send this one in the mail. The iPhone or iPad together with iFunBox works perfectly. Your files won’t get damaged, and they will be perfectly safe and sound.
How To Transfer Photos and Videos From computer To iPhone 11 Pro with iTunes
Users who have jailbroken their devices are luckier. With the huge selection of file system tweaks from Cydia, they can decompress files using special managers, download files directly from Safari, and more. The file manager iFile is a good example of this tweak. Other useful tweaks for jailbroken iPhone, iPad, and iPod touch can be found by following this link.
Transfer Videos and Photos via LANDrop
Download and install LANDrop on a Windows 11/10 PC and iPhone.
Transfer iPhone videos and photos to your PC
- Drag and drop the zip file to your desktop for convenience
- Right click on the downloaded zip and select Extract All.
- Landrop folder will appear where you need to launch LANDrop.Exe
- The program will launch and will be displayed in the taskbar

How to Transfer Photos from iPhone to PC
Run the program on your iOS iPhone and:
- Click the Select Photos/Video icon at the top
- Select the photos and videos you want, then click on Add
- Click on Devices and choose a computer name
If PC is not displayed, then close the application on the phone and PC and restart them, then repeat the above steps.
When you click on the computer name on your phone, the Windows 11/10 desktop will display a message to accept the files. Press Yes.
The photos and videos are then automatically saved to your computer in your LANDrop download folder.
Transfer videos and photos from PC to iPhone
If you need to transfer photos from your Windows 11/10 computer to your iPhone, run the LANDrop program on both your PC and iPhone:
On the phone, tap accept in the Receiving box, and then the photos or videos will be downloaded to the phone over Wi-Fi. Tap on Files at the bottom and you’ll find the accepted data, which you can share or move to your desired location (by opening the Files app and the LANDrop folder).
Itunes
It is possible to transfer photos from the computer to the iPhone via a proprietary application from the manufacturer; all you need to do is to have an Apple ID account, install the software on your PC and find the USB cable for the phone (preferably the original one, although any in working order will do).
Important: you can also download photos from your computer to your iPhone via Wi-Fi; however, if you plan to add a large amount of data to the memory of the device, it is not recommended. Wireless file transfer quickly drains the battery.
To transfer photos from the PC to the iPhone via iTunes, you must:
- Connect the iPhone to the computer and wait for the device to be authorized. Select the photos on your PC in the iTunes main window, and for your phone, choose the folder you want to download the files to.
- Click on “Import Selected” or, if some of the pictures from the computer have already been transferred to the iPhone, “Import All New”. And leave the devices alone until the process is complete.
If you do not want to repeat the above manipulations every time, you should set up iTunes to synchronize data, so you can copy photos from the computer in two clicks:
- Go to “Backups,” select the “This computer” option (for easy copying of photos both from the computer to the iPhone and back) and check the “Synchronize automatically” checkbox.
- The next time you connect the phone to copy the photos to the internal memory, select the synchronization option and, if the process does not start automatically, click on the appropriate button.
Important: In the same way you can transfer not only music and movies, but also ringtones. And even backup files. To your iPhone.
How to transfer photos from computer to iPhone or iPad
We are often asked the question: how to transfer photos from your computer to your iPhone or iPad. And in fact it is not as easy as on Android, where we can work with photos in flash drive mode. With Apple, it will take a few gestures in iTunes. There are a few more nuances.
Apple makes really handy things, but for some reason they make things very complicated. And you have to put up with them, because there is no alternative. Such moments include downloading music and photos on your iPhone or iPad.
And ordinary users simply stop using such functions as uploading photos, melodies, videos and music to their iPhones and iPads. I’ll tell you, I’m one of those. I prefer to store everything in online storage, the same DropBox, for example, which I will talk about in other articles. And uploading pictures via iTunes does not make me happy :-)).
And so, let’s say we really need, but we can’t use the Internet to access online storage, on an airplane, for example, or at grandma’s in another city or village. In general, it does not matter, there is no internet, we need the photos on the gadget. Well, let’s do it through iTunes.
First, let’s learn how to download photos to iTunes, and then talk about things to consider.
We connect the iPhone or iPad to the computer and turn on iTunes.
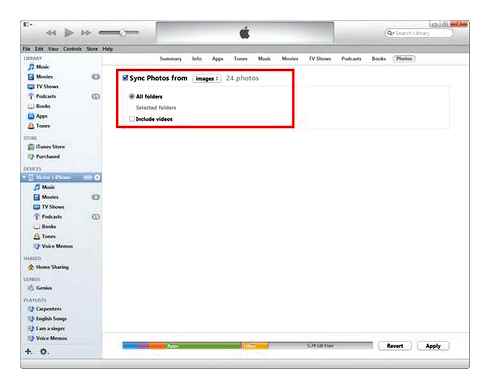
We click on our device and go to “Photos”.
We press the checkbox “Synchronize Photos from” and choose the folder in which we previously put all the necessary pictures and photos.
Here we can check the “include video in sync” box so that we don’t forget to transfer video files to our gadget as well.

Press apply, the synchronization will start and the photos will be available on your device.
Everything seems to be simple, but now some points that make me prefer DropBox.
In advance, all the photos or pictures must be unloaded into a common folder (you can make subfolders inside), because iTunes allows synchronizing with only one folder.
This means that if you select another folder on the same computer or on a completely different computer, everything that was previously synced on your phone or tablet is erased! And replaced by the new folder. Be careful! Thus, the new photos you have to throw in the same general folder that was previously synchronized, not to delete existing photos. This also means that the iPhone and iPad should sync only with one computer and only one shared folder of photos and pictures.
All the photos will appear in the Photos app, but they will not appear with the photos taken on the device, they will appear in a separate category or categories (if you had several subfolders in a shared folder) and you can’t delete them on the device itself. Each category will be called what the subfolder is called. On the one hand it is convenient, it allows you to organize the entire archive of photos and arrange everything in folders. But the lack of possibility to throw them together with the taken photos in one pile is also depressing.
In fact, the handling of photos and synchronization with iPhone or iPad requires not only the skills of working with iTunes, but also the correct storage of photos and pictures in a special shared folder for synchronization. And sometimes it is really inconvenient. While I would like to work with photos in flash drive mode, as on Android, freely deleting unnecessary ones, and loading photos from different sources.
We hope that someday Apple will revise this process and simplify the addition of pictures, photos, videos and music to the iPhone and iPad.
Join us on VK, Instagram, Odnoklassniki. To keep up with the latest news from the world of Apple and our company.
Copying photos via the cloud
And the question of how to transfer photos from computer to iPhone with the help of cloud computing does not involve the use of a cable at all. That is, in fact, you can do without connecting the device to the PC. But for completeness, let’s also consider this method.
First of all, update your software to the latest version, as recommended by the manufacturer.
Next, you need to log in to iCloud with the same ID on both the PC and the smartphone. On the iPhone in the personal section of the settings to select the cloud, and already in it to open the item Photos and turn on the media library.
On Windows, install the iCloud app and enable the media library in settings.
Open the folder with the photos in Explorer and use “iCloud Photos” under Favorites to upload the photos to the cloud. After that, the pictures will be available on your iPhone if it has an Internet connection.
On Mac you need to activate the media library in the system preferences (iCloud, then photo settings).
Important! This method is not compatible with iTunes. Use only one of them.

The alternative way to copy photos from your computer to iPhone through iCloud implies that you open access to the pictures in the cloud. You can do it via the sharing function in the Photos program. In this case you can show the pictures to any contact that you invite.