How to transfer files from iPhone to computer
How to transfer files from iPhone to computer
Introducing the first generation iPhone, Steve Jobs has made a real “revolution”, changing the market for mobile devices. Soon, the line of mobile devices was joined by a truly unique tablet PC iPad. Together with iMacs and MacBooks, the Americans have managed to create an “apple” ecosystem, where all the gadgets are connected and complement each other.
But alas, not everyone is excited about the prospect of “switching” to a completely different operating system. Statistically, more than 80% of iPhone owners pair their device with PCs and laptops running Microsoft Windows. And when you buy an “apple” phone, the average user does not even think about how to transfer the data from iPhone to computer. Whether you can download photos without using third-party software? How to Use iTunes to Copy Media? Why Apple introduced iCloud and how to work with the cloud service? The experts from iLikeService have collected the most necessary and useful information for you!
Transferring photos from iPhone 6/7/8/X to your computer via iTunes
Itunes itself is not designed to handle photos. However, it is possible to synchronize photos with the “Photos” program.
Launch iTunes. Connect your iPhone. Click on the icon of the connected device in iTunes.
In the panel on the left side of the iTunes window, click “Photos. Check the “Synchronize” box. Check the “Selected folders” box. Check the box on the folder we created earlier and put photos there
Select a directory for synchronization. Run the “apply” command. And perform the photo transfer.
Importing to a Mac
You can use Photos to import photos from your iPhone, iPad, or iPod touch to your Mac without using iCloud Photos. You can also use these steps to import pictures from digital cameras or SD cards.
- Make sure your Mac is running the latest version of iTunes. You need iTunes 12 to import photos to your Mac.5.1 or later.
- Connect your iPhone, iPad, iPod touch, or digital camera to your Mac with a USB cable. If you’re using an SD card, insert it in the SD slot on your Mac or plug it in with an SD card reader.
- You may need to unlock your iOS device with a password. The “Trust this computer” warning may also appear on the iOS device. Tap “Trust” to continue.
- On your Mac, “Photos” opens automatically. Otherwise, open the Photos app.
- In Photos, the Import screen opens, displaying all of the photos and videos on the connected device. If the “Import” screen doesn’t open automatically, click the “Import” tab at the top of Photos or click the device name in the sidebar.
- To import a portion of your media library, click the photos you want, then click “Import Selected. To import all new photos, click “Import All New Photos.
- You can disconnect your device from your Mac now. If you imported photos from an SD card or other USB device, first safely remove the device.
On macOS High Sierra or later, imported photos appear in the “Import” album of Photos. If you’re using an earlier version of macOS, you’ll find them in the “Last Imported” album.
Photos and videos synced from your computer to your iPhone, iPad, or iPod touch via iTunes cannot be imported back to your computer.
How to transfer books from your computer to your iPhone or iPad using iTunes
It’s a little different with books. We’ve already described in detail three different applications for reading books on iPhone and iPad: iBooks, Bookmate, and iChitalka. Follow the appropriate links for more information about this process.
Download and install the latest version of iFunBox.
Open the program and connect your iPhone or iPad to your computer. You must have iTunes installed on your computer, so the iFunBox can see your device.
The device will be detected in the program and you can copy absolutely any files to it, using your iPhone or iPad as a flash drive.
Drop the files you want to “transfer” to the “Shared Storage” folder.

A very useful solution that can help at the most crucial moment. If you have no flash drive at hand, but need to download an important file that weighs a few gigabytes. Don’t send it by mail. Iphone or iPad together with iFunBox works perfectly. Files are not damaged and are unharmed.
Users who have jailbroken their devices are luckier. With a huge selection of tweaks from Cydia to work with the file system, they can unpack files using special managers, download files directly from Safari and much more. The file manager iFile is a prime example of such a tweak. Useful tweaks for jailbroken iPhone, iPad and iPod touch devices can be found here.
Rate 5 stars at the bottom of this article if you like this theme. Subscribe to us on Instagram. Viber.
Sometimes you need to transfer files urgently from your computer to your phone: programs, books, movies, music, photos, presentations, TV shows, etc.Д. Even if it’s personal data. Word and Excel office documents, home photos and videos, contact lists, mail and messenger history. The goal is still the same: to transfer files from your computer to your phone so you can have them at your fingertips. There are several ways to do it, you just need to choose the easiest and most affordable one for your situation.
How to transfer files from iPhone to PC
Step 1 First of all, download and install the software using the right link below to your computer. When the installation is complete, it will automatically open. After that, connect your iPhone to your computer via USB cable.
With FoneTrans for iOS, you can freely transfer your data from iPhone to PC. Not only can you transfer iPhone text messages to your computer, but you can also easily transfer photos, videos, and contacts to your PC.
- Transfer photos, videos, contacts, WhatsApp and other data with ease.
- Preview your data before transferring.
- Available for iPhone, iPad, and iPod touch.
Step 2 As you can see, all the contents like Media, Playlists, Photos, Books, Contacts and SMS are shown in the left column. You can selectively transfer any files to your computer. If you want to transfer PDF files, select Books and all the files stored on your iPhone will be listed. So check those files you need and find a place to save those exported files on your computer.
Okay, that’s the whole process. With just a few clicks, FoneLab for iOS makes it easy to transfer data from your iPhone / iPad / iPod to your computer. Use the tool to transfer music from iPhone to computer instead of using iTunes, you’ll find it much easier and faster.

With FoneTrans for iOS you can freely transfer your iPhone data to your computer. Not only can you transfer iPhone text messages to your computer, but you can also easily transfer photos, videos and contacts to your PC.
Transfer photos from your iPhone to your PC
Option 1. Transferring photos from iPhone to PC using iTunes
Itunes. Is the default tool that allows users to easily manage data between their computer and iOS devices.
Step 1 Download iTunes from the official Apple website and install it. Please make sure that you have the latest version of iTunes installed.
Step 2 Run iTunes and connect your iPhone to your computer with a USB cable.

Step 3 Click on the device icon in iTunes.
Step 4 Click the box next to Synchronize Photos.
How to transfer files from IPHONE to PC without Losing Quality|2 Best Ways
Step 5 From the drop-down menu, select the photos to sync.
Step 6 Choose to sync all of your photos or selected albums.
Step 7 Click Apply.
Step 8 Delete photos to make room. Once syncing is complete, you’ve already saved photos from your iPhone to your computer. You can delete these photos from your iPhone now.
Option 2. Transfer photos from your iPhone to your PC using iCloud.
Icloud. Is another Apple way that you can use on your computer to conveniently manage your iPad data.
Option 1. Download iCloud to your computer
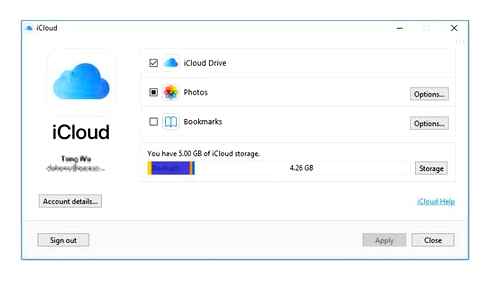
Step 2 Open iCloud for Windows and sign in with your Apple ID.
Step 3 Tap Available options next to Photos.
Step 4 Select iCloud Photo Library and Download new photos and videos to my computer.
Step 5 Tap Done, and then tap Apply.
Step 6 Turn on the iCloud Photo Library on your iPhone. You can check your photos on your computer via iCloud now.
Step 7 Delete your photos from your iPhone now. You have already copied iPhone photos to PC, now you can delete photos from your iPhone.
The new photos and videos you automatically download from the iCloud Photo LibraryPictures on your PC will not be changed even if you delete the photos on your iPhone.
How to transfer files from iPhone to Windows Pc ��
Option 2. Go to the iCloud web page
If you don’t want to install the software on your PC, the iCloud web page is a good choice for you.
Step 1 You’ll need to turn on iCloud Photos to upload and store all your photos and videos to iCloud through Settings [your name] iCloud Photos iCloud Photos.
Step 2 Just need to go to iCloud.Com and log in to your account. Select Photos and find what you want, then click Download icon to save them to your computer.
You’ll have questions about how to transfer images from your iPhone to your PC without iTunes or iCloud if you want to sync your iPhone with either of them after the above demonstrations.
In this case, you’ll need FoneTrans, an efficient and secure third-party tool that helps you upload photos from your iPhone without Apple.
Download photos from iPhone to PC using FoneTrans for iOS
Step 1 Download and install FoneTrans for iOS from the buttons below. Both Windows and Mac versions for options. The program allows users to download and install in just five steps. Please make sure you have the latest version of iTunes.
With FoneTrans for iOS you can freely transfer your iPhone data to your PC. Not only can you transfer iPhone text messages to computer, but also easily transfer photos, videos and contacts to PC.
- Transfer photos, videos, contacts, WhatsApp and other data with ease.
- Preview your data before you transfer.
- Available for iPhone, iPad and iPod touch.
Step 2 Run the program, then connect and connect your iPhone to your PC. After connecting your iPhone, please mark Trust on the screen of your iPhone the program will display your iPhone automatically.
Step 3 Tap Photos and preview them.
You can see all the information about your iPhone on the interface once your device is detected. Tap Photos from the left pane at the moment, you can view all your photos on the page before transferring these photos from iPhone to PC.
Note that you can double-click the photos to enlarge and view them.
Step 4 Choose photos. You can select one album or right-click to check all.
Step 5 Tap Export to and choose a folder. Click Export to and then select a local path to save the photos, click OK.
Step 6 Get photos from iPhone now. After moving images from your iPhone to your computer, you can delete photos from your iPhone to free up your iPhone space now.
If you only want to save your iPhone photos to your computer in JPEG format, you can go to Photo Settings Transfer to Mac or PC Automatically do this. If you set your iPhone or iPad to “Save Originals,” HEIC images will remain in the same image format.
Why iTunes Photo Transfer is not recommended?
“Once you have a few thousand photos, Apple products don’t make it easy to manage.”.

If you go to Apple’s online communities, such negative Комментарии и мнения владельцев on iTunes are usually seen. The unfriendliness of iTunes is agreed upon by almost all Apple fans, especially with regard to photo syncing and the difficulty of working. Basically, iTunes is hardly a satisfactory tool for transferring pic from iOS devices to laptops when you have a large number of photos to transfer. If you need to move photos in batches or photo albums, and at the same time you need to select certain images before transferring them, iTunes. The last tool you want to try. Since many users need mass and selective transfer of photos, we rather try to use the following methods instead of iTunes.