How to connect the soundbar to the TV set with HDMI
How to connect the soundbar to the TV
Modern televisions are equipped with all the features you need to comfortably watch movies and TV shows. You can buy a device with a high-quality picture in HD, with a thin AMOLED screen and other features. Despite this, the sound in TV is not fully implemented. That is why users often buy a speaker system. How to connect the soundbar to your TV. Let’s understand in this article.
Many people are familiar with the speaker systems of earlier production. It is a subwoofer with several (the number depends on the model) mid- and high-frequency speakers.
Most often they were connected with an RCA (bell) cable to a computer, TV or other devices via 3.5 mm plug. One of the most striking advantages of these systems was the loud sound. They are still often used today, but are beginning to give way to the next milestone in development. The soundbar.
These sound devices for TVs have two advantages at once. Clarity and sound quality. As well as the ability to connect wirelessly via Bluetooth. They can also be connected to a home network for more flexible control. The new system consists of an active (low frequency) and a passive (long panel) subwoofer. Usually the latter has control buttons for playback on independent sound sources.
How to Connect Cable Box to Soundbar using HDMI
A button should be placed on the subwoofer that activates the Bluetooth module to connect to the main panel.
Location
If the TV stands on a cabinet, rack, shelf, table or dresser, the soundbar can simply be placed directly in front of it. It is necessary, however, to measure the distance from the rack surface to the screen and check if the soundbar will fit into this gap and will not obstruct the image. But such location is ideal, the sound will be almost “out of the picture”.
If you want to install the soundbar inside the rack, it shall be pushed forward as much as possible to prevent the sound from interfering with the side walls of the rack. It is also necessary to take into account that the soundbars supporting Dolby Atmos and DTS:X should not be placed inside the racks, because they work with sound reflected from the ceiling to create vertical audio effects.
The front and side panels of the soundbar are best left uncovered and do not impede sound propagation. Although the picture shows otherwise
If the TV set is hanging on the wall, it is possible to screw the soundbar under it as well. Many models are equipped with wall fasteners. It can be placed both under the TV-set and above it, but it’s better to place it underneath, as the height of sound source is approximately the same as the height of listeners, and such variant looks nicer, in our opinion. Soundbars often come with fasteners and/or paper templates that allow you to easily mark the wall for screw holes.
Bluesound Pulse Soundbar can be even fixed on the TV-set stand
If there are no fixings with the soundbar it is worth referring to its user’s manual and seeing if it can be hung up on the wall and what the manufacturer recommends to buy for it.
Connection options
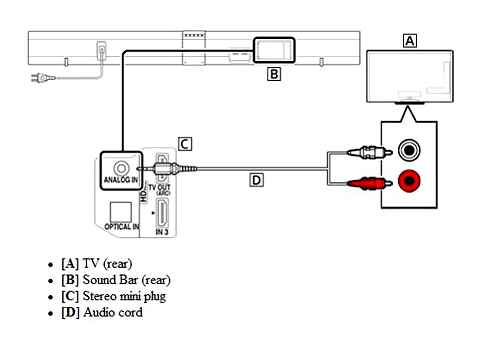
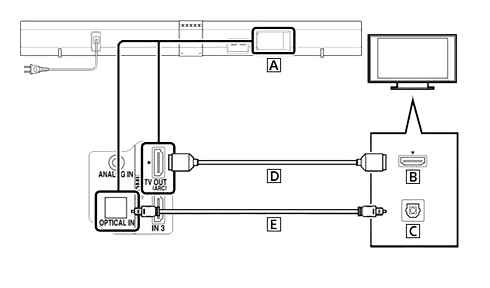
In addition to the digital optical, digital coaxial and analog stereo inputs, which we described in the last section, the higher-end soundbars are also equipped with other connectors. You can see them in the picture.
HDMI. Using HDMI input you can transmit the video signal from the DVD/BD player and TV set-top box to the TV set via the soundbar. The soundbar passes the video signal through itself without changing it in any way, but it takes the sound out of the broadcast and decodes/processes it independently.
This solution reduces the clutter of wires: no need to connect the TV with a separate cable to both the video source and the soundbar. Over, the soundbar is capable of supporting HDMI ARC (Audio Return Channel). Then the TV set sends the audio signal to the soundbar using the same HDMI cable that the soundbar uses to transmit video to the TV set. This again reduces the number of cables required.
To use this feature, you need to activate it in your TV’s HDMI menu. It is best to consult the user manuals for both the soundbar and the TV before doing this, since different brands have these settings in different sections.
Subwoofer output. Many soundbars have a subwoofer output. If the soundbar you’re tuning has one, you can physically connect an external subwoofer to it. Very often subwoofers are needed by soundbars as low-frequency support for more complete movie viewing.
And while soundbars often come with a subwoofer, some are still not burdened with it. But if there’s a jack, a subwoofer can be added to the system on its own. Many soundbars that come with a subwoofer communicate with it wirelessly to reduce the number of cables required, even if they have the necessary connector.
Ethernet port. Another connection option is the Ethernet port. Soundbars with this connector can be connected to your home network, and through it to streaming services. Or even incorporate it into a multi-room system.

Often soundbars with an Ethernet port have Wi-Fi, which, again, requires no cables. Here you can choose which network connection is more convenient for your case.
How to Connect a Soundbar to a TV via Bluetooth?
How to place the soundbar correctly
A subwoofer is an oblong sound bar, often with a built-in subwoofer. They are engaged in the production of many popular brands, in great demand units have LG, Sone, Phillips, Samsung and other well-known manufacturers. They offer the devices as a replacement for the regular sound, in order to improve the sound quality.
In order for the soundbar to reproduce quality sound, you need to ensure that the device is set correctly. The right thing to do is to place the soundbar under the TV, you can hang it up or place it on some surface. For people who have a fireplace at home, there is the option of placing the soundbar on a mantelpiece.
How to connect external devices to your Soundbar Using HDMI cables | Samsung US
If you place the soundbar under the TV set, the sound panel will be located at head level, which will provide direct sound delivery. Also such a location will provide a surround and vivid sound output.
It is important to take into account that installing the soundbar away from the TV set will risk losing the illusion of spatial sounding and provide muffling of the sound signal. Also the sound quality will sharply deteriorate if the soundbar is placed over the TV set.
Hang it on the wall
If you have room under the TV, you can place the soundbar. It is important to take into account that the distance between the equipment shall be not less than 10 cm. It is possible to hang the soundbar on a bracket. This may already be included with the sound bar, but usually you need to purchase it separately.
Many stores offer for purchase original brackets for soundbars, produced by the manufacturers themselves. However, there are also often brackets on sale made in China, which differ in their cost, but they are not inferior in quality.
Before you start mounting the device, you should make sure the wall is secure. It must be strong and able to hold the device. Next, you need to choose a suitable fastener for the wall according to its material. Then you need to attach the bracket and use a level and screws to secure it. Some brackets have a mark in the middle in the form of an arrow. If the installation is done, it will be placed directly opposite the center of the TV. After successful installation of the bracket, it is necessary to install the soundbar and make sure that it is fixed securely and steadily.
Place it on the shelf
In the case of a TV set on a nightstand, the soundbar must be installed directly in front of it. First, you need to make sure that the soundbar doesn’t cover the TV screen. It is possible to place the soundbar on the bottom shelf of the night table, but it shall be taken into account that the side walls of the night table will distort the sound, therefore the soundbar shall be put out a little.
It is worth to note that one shall not install the soundbar with Dolby Atmos, DTS:Х presence inside the column, because the vertical sound effects are created due to acoustic wave reflection from the ceiling.
After fixing the unit it is necessary to check whether all its sides, except the rear side, are not covered by any other objects in order to prevent deterioration of sound quality.
Connecting the JBL Soundbar to a TV through HDMI
This is the most common connection method. Its advantages:
- The soundbar is switched on at the same time as the TV set is powered on (i.E.Е. The soundbar does not need to be switched on separately)
- Adjust sound level on both devices with the same remote control
- Better sound quality compared to optical and wireless connections.
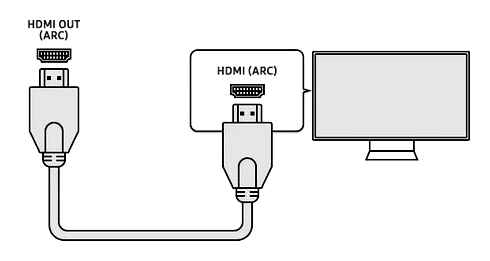
In order to connect, you will need an HDMI cable and the TV set must have an HDMI connector (ARC). As a rule, all modern (and not so modern) televisions have it.
Connecting the soundbar to a Samsung TV through HDMI
To control the soundbar with the TV remote control and run it at the same time as turning on the TV, allows a proprietary technology from Samsung. Anynet. Usually it is already active from the factory, so do the following to get the sound to play from the soundbar:
- Plug one end of the HDMI cable into the HDMI OUT (TV ARC) connector on the JBL 2 soundbar.1 (similar for other models)
- The other is in the HDMI ARC input of your Samsung TV
- Turn on the TV and the soundbar should turn on automatically.
If the sound is still coming from the TV speakers, go to the settings menu, go to Audio/Sound and select external speakers as the sound source.

Anynet is activated in the settings. Depending on the TV model, paths may be as follows:
Home. Settings. General. Manage Your External Devices. Anynet. (HDMI CEC)
Home. Settings. System. Expert Settings. Anynet. (HDMI-CEC)
Connecting the soundbar to LG TV through HDMI
- Plug one end of the HDMI cable into the HDMI OUT (TV ARC) connector of the sound bar
- Plug the other end of the HDMI cable into the HDMI ARC connector of the TV
- Turn on the power of the devices
- On your TV, go to ” Settings ” menu
- Under “Audio” find “Digital Audio Out” and set it to “Auto”
- If necessary, set the audio source to be an external audio system instead of the TV speaker
- Turn on the Simplink option on your LG TV so that the soundbar turns on at the same time as the TV.
Simplink is an HDMI control protocol for LG Smart TVs.
You can find the detailed instruction on how to connect the soundbar to LG TV in the official instruction.
Connecting the soundbar to Sony, Xiaomi, Philips and other TV through HDMI
Above we have reviewed the step by step process to connect the sound bar to LG and Samsung TVs. Connection to TV of other manufacturers. Xiaomi, Sony, Philips, Haier, will be similar, the only difference will be the name of the items in the menu.
Let’s take the Sony Bravia Smart TV as an example:
- Take an HDMI cable and plug it into the HDMI OUT (TV ARC) connector of the soundbar
- Plug the other end into the HDMI ARC connector on your TV
- Press Home button
- Go to the settings menu (Settings) and open the “Sound” section
- Select “Audio system” under “Speaker”
- Under “Digital Audio Out” select “Auto”
In order to make the JBL 2 soundbar.0 or any other switched on when you start the TV and you can control the sound from a single remote, do the following:
- Open the settings menu (Settings)
- Enter the “External Inputs” section
- Open the “Sync Bravia” item
- Enable “Sync Bravia Control”
Sync Bravia is to control your Sony TV via HDMI, LG has a similar item called Simplink.
In the table below you can see the names of the protocols to control the soundbar with TV from different manufacturers. Most likely this will be the name of the menu items you need to activate.
| LG | SimpLink |
| Samsung | Anynet |
| Onkyo | RIHD |
| Sony | Bravia Sync |
| Hitachi | HDMI-CEC |
| Pioneer | Kuro Link |
| Toshiba | Regza Link and CE-Link |
| Sharp | Aquos Link |
| Panasonic | VIERA Link, HDAVI Control and EZ-Sync |
| Philips | EasyLink |
| Mitsubishi | Net Command |
Using the sound bar with a receiver
So, now that you understand the different methods you can use to connect your sound panel directly to an audio source, there is one more option that might interest you (in addition to setting up a microphone with it, for which we have a guide ). If you currently have an amplifier or receiver, you may be wondering if you should connect your soundboard to your TV with this equipment.
Even if you don’t already have the equipment on hand, you may be wondering if adding an amplifier or receiver will improve the sound quality. We have another article that goes into more detail on this, but in short, you probably don’t want to use an amplifier or receiver with your soundboard.
First, an installation with a receiver and soundboard leads to additional complexity because you have to manage extra equipment and cables that won’t bring you anything extra. If your soundboard doesn’t have the ports available to support the level of sound quality you want, then adding a receiver won’t get you there, because soundboards aren’t designed to work with receivers.
Instead, most sound panels act as receivers themselves, replacing this equipment. Some models even take this task to an extreme, such as the Nakamichi Shockwafe Ultra (on Amazon), which offers multi-channel speakers to which the sound is routed from the soundboard.
And in some cases, using an amplifier that sends the signal to the soundbar can damage the acoustic equipment. This is because sound panels usually do the amplification on their own side, so sending the signal to the receiver/amplifier and then to the soundbar will result in double the signal amplification, which can damage your equipment.
Recommended HDMI and optical sound panels
Many different soundbars are available today. Although I have specific buyer’s guides on which sound panels and speaker systems, the two best HDMI and optical sound panels models you’ll find below are highly recommended products. Both will work well as standalone sound panels or as part of a complete home theater.

Yamaha YAS-207BL Soundbar (HDMI model)
Yamaha’s soundbar system, the YAS-207BL, has a lot to offer. Elegant and clear, this model has 100 watts of power. It connects wirelessly to the included subwoofer, which helps your sound stay true and crystal clear no matter what tone is used. Reviews from various sources help make this HDMI sound bar one of the most respected today that won’t break the bank.
YAS-207BL supports HDMI, optical and analog audio inputs. That lets you use it with almost all of your home theater systems. In addition, this wall-mount soundbar is 36-5/8 inches long, 2-3/8 inches high and 3.25 inches deep.
2.Sony 1-channel sound panel (digital optical model)
Sony’s soundbar system 2.1 channel, model HT-CT290, is one of the best budget friendly options for those looking for an optical model. This ultra-slim soundboard delivers 300 watts of power. It also connects wirelessly to the included subwoofer; this helps make those deep tones rich and well-developed. This soundboard, designed for wall mounting, has repeatedly received excellent feedback from users.
The HT-CT290 includes an optical cable and USB ports. It supports many different audio formats, including various Dolby signals. The sound panel itself is 35.5 inches long, 2.1 inches high and 3.4 inches deep.