How to Connect a Modem to an Android Tablet
Some tablets do not have a built-in 3G module, so they can access the Internet only via Wi-Fi. The user can expand the functionality of the tablet by following a fairly simple instruction. In the article, you will learn how to properly connect a 3G modem to an Android tablet.
Necessary equipment
To connect a modem to your Android 3G tablet, you need the following equipment:
- 3G modem with a SIM card, purchased from a mobile operator.
- A tablet with a USB port.
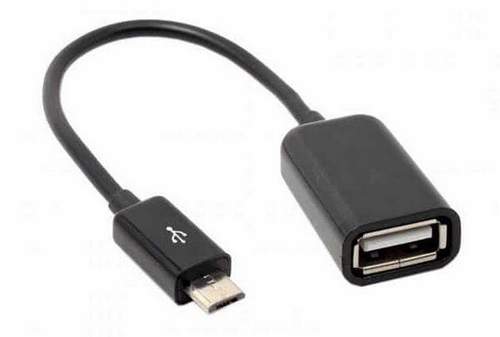
- OTG cable (host). It comes complete with a tablet.
In some cases, the connection is hampered by the fact that the tablet does not have a full USB connector. Instead, the manufacturer installs a Micro USB port. To connect a 3G modem in this case, you will have to use a special adapter. the host OTG cable.

If nothing happens when connecting the equipment via the OTG cable, that is, the tablet does not notify that a new device has been detected, then most likely the tablet simply does not support USB host mode. The only way out is to replace the tablet with a more modern model, which has no difficulties connecting external devices.
If during connection the screen starts blinking, goes in stripes, and the device reboots or turns off, then the reason for this is the insufficient voltage or current level for the modem’s power. You can try connecting the equipment to the tablet with the charger connected.
When connecting with an OTG cable, try replacing it with a better accessory or use a USB hub with external power to connect.
Modem Setting
If you simply connect the USB 3G to the tablet, it will be identified as a flash drive. To avoid this, you must first configure the modem by setting a special mode for it. Use the 3G Modem Mode Switcher program to perform the specified operation.
- Connect the USB modem to the computer. Wait for the software to install automatically, or install it manually.
- Launch the 3G Modem Mode Switcher utility. The program will detect the connected device. Click “Only Modem” to put the equipment into this mode.
If 3G Modem Mode Switcher doesn’t work, use a different mode of activating the “Modem Only” mode, which implies using the HyperTerminal program features:
- Connect the modem to the computer.
- Open Device Manager and find the connected equipment. Go to its properties and go to the “Modem” tab.
- Remember the value of the “Port” line.
- Run the HyperTerminal utility. Write any name for the new connection.
- A window with settings appears. In it, select the port that you saw on the “Modem” tab.
After specifying the network port, edit the configuration file. Open the “File” menu, select “Properties” and go to the “Settings” tab. Press the “ASCII Setup” button. Activate the checkbox “Echo typed characters locally”. A terminal opens where you need to type the command “ate1”. A message should appear stating that everything went OK. After that, you can enter the following command. “AT ^ U2DIAG = 0”.
Another option: use DC-Unlocker to disable the CD-Rom and CardReader functions. The procedure is approximately the same:
- Connect the modem to the computer. Launch DC-Unlocker and click “Detect modem”. If the device is detected, its technical characteristics will appear in the program window.
- Run the command AT ^ SETPORT = “A1; 1,2 ″ to disable CD-Rom and CardReader.
If you decide to return these functions to the device later, run DC-Unlocker again and run the query AT ^ SETPORT = »A1; 10,12,13,16, A1, A2 ″. If the modem has its own software for managing settings on the computer, use it to disable PIN verification. This is usually enough, but depending on the model and manufacturer, the setup procedure may vary slightly. Therefore, connecting the modem to the tablet, you need to pay attention to the features of the equipment, which are usually indicated on the website of the mobile operator.
Android setup
Having configured and connected the modem to the tablet, you can proceed to set the network parameters on Android.
- Go to settings and enable mobile data transfer. Be sure to turn off Wi-Fi. If there is no mobile data transfer in the settings, you need to flash Android with an alternative version of the system in which such a module is installed.
- Go to the APN Access Point section. Create a new point and enter the data for Internet access provided by the operator. You can find them on the operator’s website, usually in the “Settings” section.
Having found the data for the APN, proceed to its creation, otherwise the device will not be able to use mobile Internet:
- Open the Android settings, go to the “” section and select “Mobile networks”.
- Tap on the “Access Points” item. If there is no point, click on the plus sign to create a new point.
- Enter the data that you looked at the website of the mobile operator.
For example, if you plan to use a modem and a SIM card from MTS to access the Internet, then at the new APN point you must enter the following data:
- Name. MTS internet
- APN. internet.mts.ru
- Login. mts
- Password. mts
The remaining values remain by default, you do not need to change them. For other operators, the procedure differs only in content, the essence of the operation remains unchanged. Often you do not need to create APN points yourself at all. If you purchased a modem for a tablet and a SIM card from the operator himself, then they are already configured as needed, so that in the Android settings without your participation, the APN points necessary for connection will be displayed.