Asus vivobook how to boot from USB flash drive
Graphic UEFI BIOS configuration. BIOS Utility. EZ Mode
As in the previous case, the initial steps are the same. Insert bootable USB stick, press F2 and power the notebook.
View of the main UEFI BIOS settings window on an Asus laptop
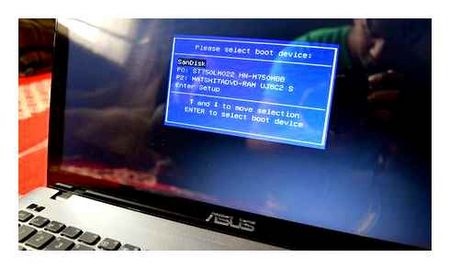
Press F8 button and choose your flash drive from the list displayed by pressing Enter. Your flash drive may appear twice in this list: with and without the UEFI prefix. This is normal. Try it with UEFI first and if it doesn’t start booting, go to BIOS again and try to select the version without UEFI.
If your flash drive is not on the list, then try the following. Press F7 to enter advanced settings. Go to the tab Security and set the option Secure boot control to Disabled.
In the Boot tab, turn off the Fast boot option, setting it to Disabled.
It is also worth checking the Advanced tab.Choose menu “USB Configuration”. If there is Legacy USB Support option, set it to Auto or Enabled. If you have XCHI Pre-Boot Mode, set it to Auto or Enabled.
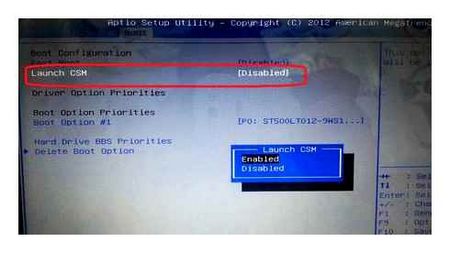
The last thing to change is Launch CSM (CSM Boot) to Enabled.
Press F10 to save your settings and reboot. After that, quickly press F2 again to enter BIOS, then press F8 to call the boot menu and choose your flash drive from there.
If you still can’t boot from flash drive, it means you need to make a UEFI/GPT bootable flash drive and repeat the above steps.
HP notebook does not turn on and Caps Lock is blinking. What does it mean?
Alex3NQ
Afternoon. As I understand my question. Asus X540YA laptop. The drive was originally marked as MBR. I used Paragon Drive Manager on a Sergei Strelec service disk to convert it to GPT. I had installed various systems on it and was experimenting. Windows 8.1, Windows 10. Always booted from a USB flash drive. And in BIOS menu there were always two options to boot from. MBR mode and UEFI mode. But for this partitioning instead of one system partition (like in MBR) during the installation 4 of them were created on the hard drive: a backup partition, UEFI boot partition, MSR (Microsoft Reserved) partition and the biggest partition with the operating system files (disk C:). When saving a partition image using various backup programs, sometimes you got a copy that could not be restored. This was one of the reasons to change the disk type back to MBR. Using the same Paragon Drive Manager program, restored the MBR partitioning. For Windows 8.1 managed to make only one system partition at all. Everything seems to be fine. But that’s not the case! Now only UEFI mode is available for booting the stick! For many operations, including backups, there is nothing to worry about. But it became impossible to install the new system. The installer states that since the installation disk is booted in UEFI mode, it is only possible to install it to a GPT disk. And since the disk is MBR, you should first convert it to GPT, and then install the system. But that’s not what I need! I specifically converted the disk to MBR! Besides I have to deal with many computers, both notebooks and desktop. But there’s nothing like that anywhere! Everywhere is able to boot in both MBR and UEFI mode no matter what type of hard drive partitioning I have at the moment. I wonder if it’s something I don’t understand or if the notebook BIOS is so incomplete?
Hello! Yesterday I got my hands on a new Asus X501A laptop. I had to install Windows and everything I needed, turnkey :). After giving it a spin, I discovered that it has no CD/DVD drive. And that means creating a bootable flash drive and installing Windows 7 from it. Even drivers for it on the disk included, too, need to rewrite on a flash drive. In general, it is strange, the laptop without a drive, and the drivers on the disk. It is necessary already on the stick drivers put in the kit, or external drive :).
Okay. I created a bootable flash drive. First I created it using a special Windows 7 USB/DVD Download Tool (I wrote about it here). But I want to say ahead of time, for some reason the installation of Windows 7 from this flash drive did not go. The white cursor was blinking and the installation did not continue. I wrote a bootable flash drive with UltraISO and everything worked. I don’t know why it happened that way :).
That’s all, the flash drive is ready. Now in the BIOS you need to boot from this flash drive. I will tell you how to do it.
Asus VivoBook. preparing to work with Windows 10
Here is a short review
- Screen: 17.3 19201080 IPC
- Processor: 2-core AMD Ryzen 3 3200U.6GHz
- Graphics Card: 2GB Radeon Rx 540X GDDR5
- RAM: 8 GB DDR4-2666
- SSD: 128GB KINGSTON RBUSNS8180DS3128GJ
- HDD: 1000GB Toshiba MQ04ABF100
- The board: X712DK
The laptop was sold without an OS preinstalled on it and it needed to be prepared for work.
How to make a bootable flash drive with Windows 10 Pro
Downloading and recording will take some time, so a new laptop can be put aside for now. To make a bootable USB flash drive I used my old laptop with Windows, it had already installed a torrent client to download the Windows 10 image and Rufus to burn it.
Download Windows 10 Pro build 18363
You can download the image of Windows from the official site, I downloaded and installed the following distribution. Загрузите microsoft-Windows-10_0_18363_720-version-1909-march-2020-update-originalnye-obrazy-msdn-ru.torrent file, open it and download the image. By default it will be in the user’s Downloads folder in your Microsoft Windows 10 folder.0.18363.720 Version 1909 (March 2020 Update). Original MSDN images [Ru], file
Save Windows 10 Pro 18363 image on a USB flash drive
You need an 8 Gb flash drive to burn it
Checking BIOS settings
Without a bootable flash drive and a preinstalled operating system the entrance to BIOS will be automatic, or you have to press Esc key about 3 times per second when switching on your notebook to enter the boot menu.

Note: The items marked X in the images are initially not present in the menu until Windows is installed
The factory default settings are made correctly and you do not need to change anything. It is important that Fast Boot should be set to Enabled, and Secure Boot Control should be set to Disabled. The absence of the Launch CSM button on the boot tab does not matter, in my case it was not there either.
Check and, if necessary, change and save the BIOS settings. Turn off your notebook.
Installing
Insert the bootable USB stick into the USB port, switch the notebook on and enter the start-up menu by pressing the Esc key during start-up about three times per second.
Installing Windows on the SSD drive is standard, just follow the installation wizard tips.
Activate Windows
To activate Windows 10 Pro and install the license key, use Widows activators. Download it using torrent. Client.
Download and run Windows 2018. AAct 3.8.3 Portable, activate your Windows 10
After successful activation, delete the downloaded activator files from the computer. Turn on the Windows Protector, or you can not do it, after a while it will turn on automatically.
Activating the hard drive
The original 1TB hard drive is not activated and formatted.
To activate the hard drive, launch the console by typing mmc in the Windows search menu on the taskbar. In the console menu, click on File, then Add or Remove Snap-in, then click on Disk Management
Run the utility, activate and format your hard drive
Installing MS Office and programs
To work comfortably, users usually install MS Office package, browsers and other frequently used programs
As a result of all the actions we get a configured laptop with activated Windows 10 Pro.
Conclusions:
Among the operating systems for desktop PCs and laptops users still prefer Windows for a reason, the biggest disadvantage of which is that they do not want to use it. price. But while there are ways to get Windows semi-legally and runet full of links where you can download it, Windows will continue to enjoy popularity. In general, there is no difference between a licensed and a pirated copy for private non-commercial use.
I’ve been using my Asus VivoBook for nearly a week for work and entertainment. So far I am satisfied with the purchase. The notebook is fast and convenient.
How to install Windows 10 or Windows 7 on an Asus vivobook
Despite all the “sights” of the Asus vivobook, and they are not few owners have some difficulties with the installation of Windows 10 / Windows 7, especially if they try to install from a flash drive.
With dvd drive is easier, but since it is not in Asus vivobook 17, Asus vivobook max, Asus vivobook flip, Asus vivobook 15, x540sa, d540n, x540ya, x712fa, a512f, x540na, x540ma dm298, 15 a512d, m712d you have to buy usb drive.
If you have a flash drive, it’s not expensive, who wants to bother with it now, if it is easier and almost everyone has it at hand now?

Also a problem for those who have installed Windows 7, as drivers are usually provided only for the tenth version.
Although here also is not all the way. I just bought a vivobook with ten, and wifi was very bad.
I wanted to download from the official site, but alas, they were not there, even his model was not found, but let’s return to the installation.
Configure the regular BIOS
After booting the operating system and writing it to a flash drive as a boot disk, you need to navigate to the BIOS.
Instructions to go into the BIOS on your Asus laptop:
- Turn off your notebook.
- Press the power button. When the manufacturer’s icon appears, press and hold down the F2 button for 5-7 seconds.
- Wait until you see a menu.
To navigate in BIOS by using the arrow keys on the keyboard. Use the Enter key to accept the values, and the ESC key to go back to them.
If you have an Asus laptop, you can set the BIOS to boot from a USB flash drive as follows:
- After you enter BIOS, go to the Security tab. It is in the top panel menu.
- Select Disabled next to Secure Boot Control.
- Go to the Boot tab.
- Turn on Launch CSM. It should be set to Enabled.
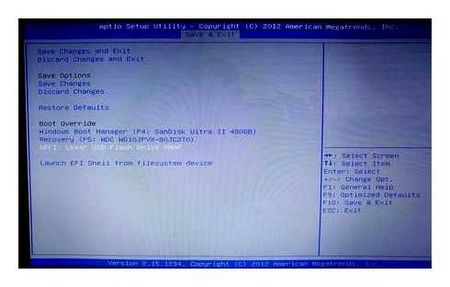
- Use the Save Exit tab to save your changes. You can also press the F10 key.
- On the same tab at the very bottom is Boot Override. Under it, click on the name of the USB key.
- Exit BIOS to start booting the operating system from flash drive.
If you are using an old BIOS (BIOS Award), it is recommended to follow the instructions
ASUS Laptop VivoBook 2020 2021 How to Enter Boot Menu & Bios / Boot Win10 Installation USB Stick
- Turn off your notebook. Press the power button.
- While the manufacturer’s icon appears, press F2 or Del.
- Go to the Advanced BIOS Features tab.
- Next to First Boot Device select the inserted drive. Verify that the Second Boot Device line displays a different boot device.
- Press Enter to accept the changes and then press ESC to exit. Make sure all settings are saved.
If you have an H2Insyde20 BIOS version the instructions for Asus are as follows:
- Press Del or F2 to enter BIOS Menu.
- Select the Boot tab.
- Set External Device Boot to Enabled.
- Set External Device to the first position under the Boot Priority item below.
- Go to Exit and select Save and Exit to apply the changes and reboot your computer.
Note! Intel CoffeeLake line of processors does not support Launch CSM function, so the value will always remain off. In that case you will need to use EZ Mode boot.
There is a short instruction below to help you do that:
- First you will need to enter the notebook BIOS by pressing Delete, F2 (for most laptops) or rarely another key.
- Select the tab “Security” or Boot and set the option “Secure Boot Control” or Secure Boot to Disabled.
- If the position is not active, go to the tab “Security” and set the password in Set Supervisor Password. After that go back, everything should be active.
- Next choose the menu “Boot” and set the parameter “Launch CSM” to Enabled.
- Press F10 to save your settings (Save and exit).
How to set boot priority in Asus BIOS?
As you can see, there is a Boot device priority menu in the BIOS settings (UEFI). To see it, you should press the Del key at computer booting (before OS startup).
| Asus | F8 or ESC |
| Compaq | F9 or ESC |
| Dell | F12 |
| ESC | F11 |
How to boot from USB flash drive in Asus notebook BIOS? Some tips on installing Windows 7 from USB flash drive 3.0
Hi all! Yesterday I got my hands on a new Asus X501A laptop. Should have installed Windows, and everything you need, turnkey :). I flipped it around and found out that there was no CD/DVD drive. And it means, that it is necessary to create a bootable flash drive and from it to install Windows 7. The drivers are on disk, so I need to copy it to flash drive. In general, it is strange, a laptop without a drive, and the drivers on the disk. Need to put drivers on a flash drive, well, or external drive :).
Oh, come on. I created a bootable flash drive. First, I created it using a special Windows 7 USB/DVD Download Tool (I wrote about it here). But I want to say ahead of time, that for some reason the installation of Windows 7 from this flash drive did not go. The white cursor just blinked and the installation did not continue. I wrote a bootable flash drive with UltraISO and it works. I don’t know why, I didn’t try to figure it out :).
The flash drive is ready. Now you need in the BIOS to set the boot from this stick. Now I will tell you how to do it.
Setting the bios
Pay attention! Other models of laptops, like Samsung, may have a special button to go into the BIOS. Asus computers may have other buttons to enable the BIOS: F1-F7.
Instructions on how to set BIOS boot priorities:
- Shut down your notebook. Go to BIOS menu.
- Press Boot.
- Under the Boot priority line, the USB flash drive should be checked in the first position.
- Press F10 to save changes and exit.
If your USB key refuses to boot, you must turn off Secure Boot in the BIOS. This process looks different on every notebook.
- Turn on your BIOS.
- Click on the Boot tab.
- At the very bottom select Secure Boot.
- Set it to Disabled.
- Press F10 to exit.
- Go to BIOS with the ESC key.
- When the window appears, press F10.
- Click the Boot Options tab.
- In the middle of the tab locate the Secure Boot line and set it to Disabled.
- Switch to UEFI mode with the F2 button while turning the notebook on.
- Click the Security tab.
- Next to the Secure Boot line, set it to Disabled.

Note! Other versions of BIOS may not include the specified partitions or tabs.
- Turn the laptop on. Wait for the desktop to fully boot.
- Press Win R key combination.
- At the prompt, type msinfo32.
- Press Enter.
- Look for the “Secure Boot State”.
- Make sure it is set to “Off”.”.
Advanced BIOS settings:
- On the BIOS Features tab, set Legacy Boot to Enabled;
- Turn on CSM through the Boot section;
- Make sure all settings are saved.
If the flash drive is not showing up again after all the settings, it means that the motherboard is obsolete.