How To Split A Drive In Windows 10

Many users are accustomed to using two partitions on the same physical hard drive or SSD. conditionally, drive C and drive D. In this instruction, we will detail how to partition a drive into partitions in Windows 10 as built-in system tools (during and after installation), and with the help of third-party free programs for working with partitions.
Despite the fact that the available tools of Windows 10 are enough to perform basic operations on partitions, some actions with their help are not so simple to perform. The most typical of these tasks is to increase the system partition: if you are interested in this particular action, then I recommend using another guide: How to increase drive C due to drive D.
How to partition a disk in an already installed Windows 10
The first scenario that we will consider is the OS is already installed on the computer, everything works, but it was decided to divide the system hard drive into two logical partitions. This can be done without programs.
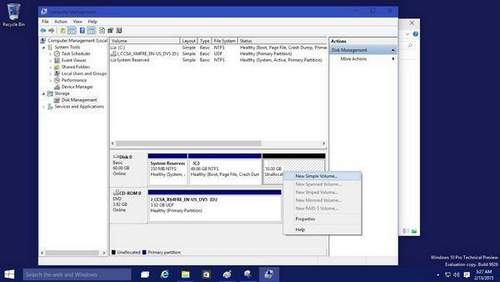
Right-click on the “Start” button and select “Disk Management”. You can also start this utility by pressing the Windows key (the key with the logo) R on the keyboard and entering diskmgmt.msc in the Run window. The Windows 10 Disk Management utility opens.
At the top you will see a list of all sections (Volumes). At the bottom is a list of connected physical drives. If your computer or laptop has one physical hard disk or SSD, then most likely you will see it in the list (at the bottom) under the name “Disk 0 (zero)”.
over, in most cases, it already contains several (two or three) partitions, only one of which corresponds to your C drive. Do not take action on hidden partitions without a letter. they contain Windows 10 bootloader data and recovery data.
In order to split drive C into C and D, right-click on the corresponding volume (on drive C) and select “Compress Volume”.
By default, you will be prompted to shrink the volume (free up space for drive D, in other words) to all available free space on the hard drive. I do not recommend doing this. leave at least 10-15 gigabytes free on the system partition. That is, instead of the proposed value, enter the one that you yourself think is necessary for drive D. In my example in the screenshot, 15,000 megabytes or slightly less than 15 gigabytes. Click Compress.
In Disk Management, a new unallocated disk area appears, and C drive shrinks. Click on the “not distributed” area with the right mouse button and select “Create a simple volume”, the wizard to create volumes or partitions will start.
The wizard will ask for the size of the new volume (if you want to create only the D drive, leave the full size), offer to assign a drive letter, and also format the new partition (leave the default values, change the label as you like).
After that, the new partition will be automatically formatted and mounted in the system under the letter you specified (that is, it will appear in the explorer). Done.
Note: you can also split a disk in installed Windows 10 using special programs, as described in the last section of this article.
Partitioning when installing Windows 10
Partitioning disks is also possible with a clean installation of Windows 10 on a computer from a USB flash drive or disk. However, one important nuance should be noted here: you cannot do this without deleting data from the system partition.
When installing the system, after entering (or skipping input, for more details in the Activating Windows 10 article) the activation key, select “Custom installation”, in the next window you will be offered the choice of the partition to install, as well as tools for setting up partitions.
In my case, drive C is partition 4 on drive. In order to make two partitions instead, you must first delete the partition using the appropriate button below, as a result, it will be converted to “unallocated disk space”.
The second step is to select an unallocated space and click “Create”, then set the size of the future “Drive C”. After its creation, we will have free unallocated space, which in the same way (using “Create”) can be turned into the second partition of the disk.
I also recommend that after creating the second partition, select it and click “Format” (otherwise it may not appear in Windows Explorer after installing Windows 10 and you will have to format it and assign a drive letter through Disk Management).
And finally, select the partition that was created first, click the “Next” button to continue installing the system on drive C.
Partitioning disc programs
In addition to its own Windows tools, there are many programs for working with partitions on disks. Of the well-proven free programs of this kind, I can recommend Aomei Partition Assistant Free and Minitool Partition Wizard Free. In the example below, consider using the first of these programs.
In fact, splitting a disc in Aomei Partition Assistant is so simple (and besides, everything is in Russian) that I don’t really know what to write here. The order is as follows:
- Installed the program (from the official site) and launched it.
- Selected the disk (partition), which must be divided into two.
- On the left in the menu, select the “Divide Section” item.
- Set new sizes for two partitions with the mouse, moving the separator or entering the number in gigabytes. Clicked OK.
- Clicked the “Apply” button in the upper left.
If, however, when using any of the described methods you encounter problems, write, and I will answer.