3 Ways To Record Video From The Screen Of Iphone And Ipad

If you needed to record from the screen of your iOS device, there are several ways to do this. And one of them, recording from the iPhone and iPad screen (including with sound) on the device itself (without the need for third-party programs) appeared recently: iOS 11 introduced a built-in function for this. However, in earlier versions, recording is also possible.
In this manual. in detail about how to record from the iPhone (iPad) screen in three different ways: using the built-in recording function, as well as from a Mac computer and from a PC or laptop with Windows (i.e. the device is connected to the computer and already on it records what is happening on the screen).
Recording from the screen using iOS
Starting with iOS 11, a built-in function for recording screen has appeared on the iPhone and iPad, but the novice owner of the device from Apple may not notice it.
To enable the function, use the following steps (I remind you that iOS version no lower than 11 must be installed).
- Go to Settings and open the “Control Center”.
- Click Customize Controls.
- Pay attention to the list “ controls”, there you will see the item “Screen recording”. Click the plus sign to the left of it.
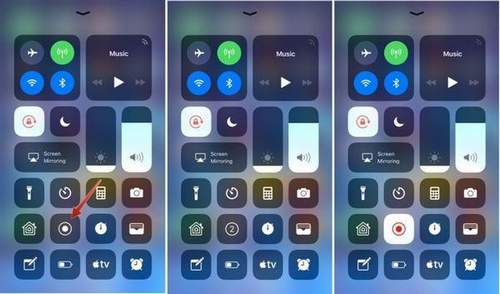
- Exit the settings (press the “Home” button) and pull to the bottom of the screen: in the control point you will see a new button for recording the screen.
By default, when you click on the screen recording button, the device screen starts recording without sound. However, if you use the strong press (or long press on the iPhone and iPad without Force Touch support), the menu will open as in the screenshot in which you can enable sound recording from the device’s microphone.
After the recording is completed (performed by pressing the record button again), the file is saved in.mp4 format, 50 frames per second and stereo sound (in any case, on my iPhone that way).
Below is a instruction for using the function, if something remains incomprehensible after reading this method.
How to record from the screen of iPhone and iPad in Windows 10, 8 and Windows 7
Note: to use the method, both the iPhone (iPad) and the computer must be connected to the same network, it does not matter via Wi-Fi or using a wired connection.
If necessary, you can record from the screen of your iOS device from a computer or laptop with Windows, however, this will require third-party software that allows you to receive broadcasts on AirPlay.
I recommend using the free LonelyScreen AirPlay Receiver program, which can be downloaded from the official website http://eu.lonelyscreen.com/download.html (after installing the program you will see a request to allow it access to public and private networks, it should be allowed).
The steps for writing will be as follows:
- Launch the LonelyScreen AirPlay Receiver.
- On your iPhone or iPad connected to the same network as the computer, go to the control point (swipe from bottom to top) and click “Screen Repeat”.
- The list displays the available devices to which the image can be transmitted via AirPlay, select LonelyScreen.
- The iOS screen will appear on the computer in the program window.
After that, you can record using the Windows 10 built-in means of recording from the screen (by default, you can call up the recording panel by pressing Win G) or using third-party programs (see Best programs for recording from a computer or laptop screen).
QuickTime Screen Recording on MacOS
If you own a Mac, you can record from your iPhone or iPad using the built-in QuickTime Player application.
- Connect the phone or tablet with a cable to your MacBook or iMac, if necessary, allow access to the device (answer the request “Trust this computer?”).
- Launch QuickTime Player on Mac (you can use Spotlight search for this), and then, in the program menu, select “File”. “New Recording”.
- By default, recording from the webcam will open, but you can switch the recording to the screen of the mobile device by clicking on the small arrow next to the record button and selecting your device. You can also select a sound source (microphone on iPhone or Mac).
- Press the record button to start recording the screen. To stop, click the Stop button.
Upon completion of the screen recording, in the QuickTime Player main menu, select “File”. “Save”. By the way, in QuickTime Player you can also record a Mac screen, more details: Record from a Mac OS screen in QuickTime Player.